Firebase is a valuable tool for developers that helps you to integrate many services like cloud messaging, authentication, realtime database, storage, crash reporting and much more . You might have already used some services from the vast pool of services that Firebase provides, and in this post we will discuss how we can add our project to Firebase and Integrate it’s cloud messaging service in our Android App. Topics discussed in this tutorial are:
- How to add an Android Project to Firebase Console.
- How to Integrate Firebase Services(Cloud Messaging)in our Android app.
- How to Send Notification to the app from Firebase console.
- How to handle Received notification and Notification data in our app.
The first step is to create a project in Android Studio and add it to Firebase Console. So let’s get started:
If you already have an Android Project in which you want to add Firebase, you can skip the section below that shows creating a new project in Android Studio. For beginners, here’s how you create a project:
You can also check out the our YouTube tutorial here: Integrating Push Notifications in Android using Firebase Cloud Messaging.
Creating a new project in Android Studio:
- Open Android Studio then from the Navigation Menu select File->New->New Project.
- Name the new project named FirebaseRealtime and click next.
- Now select a minimum SDK version of your choice, I’ve selected 5.1.
- After a minimum SDK selection click on next and select Add no Activity and click finish. You’ve successfully created an Android Project.
Adding the project to Firebase
Once you have your project ready, It’s time to add the project to firebase. Open the app-level gradle file of your project and copy the application package name. We will use it to add our project in Firebase. Check the highlighted section in the Image below for reference:
In the image above, the application package name is is com.thecodecity.firebaserealtime. Copy the package name and go to Firebase Console. You can login with your Gmail account.
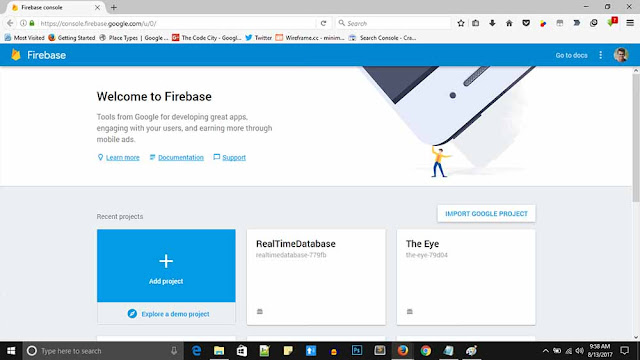
Once you are logged in you should see a screen like this:
Now click on add project and enter any name and click next. You have your project ready. Now you should be in your project console and it will look similar to this:
Notice the scroll bar at the left side, it contains many options and once you scroll down you’ll see a notifications option. Click on it, a dialog box will pop up asking for package name, app nickname and SHA1. It should look similar to this:
Everything except the package name is optional. Now paste your package name that you had copied earlier and click on register app. Now you should see another dialog with option to download json. Download the json file and copy it in the app directory of your project.
Integrating Firebase in Android App
Now that we have added the Json file in our project and added our app in Firebase console, It’s time to integrate Firebase in our Android app. First of all we need to add dependencies so that we can use classes and Methods provided by Firebase. In your project level Gradle file add the following dependency as highlighted in the figure below.
Now in your app level Gradle file, add the following dependency as shown in the figure below:
Now add this: apply plugin: ‘com.google.gms.google-services’ to the bottom of the file as shown in the image above.
Voila, finally we are now ready to write some code!
We need to create two services, one to get the refreshed token and other to handle notification that the app will receive. The refreshedToken is actually a device registration ID that Firebase generates that uniquely identifies a device. It can be used to send notification to a particular device from the vast pool of devices in which your app is installed.
Let’s get started and create the first service. Name it MyFirebaseInstanceIDService.java. Here’s the code:
public class MyFirebaseInstanceIDService extends FirebaseInstanceIdService {
String refreshedToken;
@Override
public void onTokenRefresh() {
Log.d("mylog", "Inside on token refresh");
//Getting registration token
refreshedToken = FirebaseInstanceId.getInstance().getToken();
//Displaying token on logcat
Log.d("mylog", "Refreshed token: " + refreshedToken);
}
}
In the code above we are not doing anything important, just displaying the token in the log. In real world applications it can be stored in a database in a server and later it may be used to send individual personalized notification to the device. The Token is refreshed only once when the app is installed in the device. So you will not be able to see this log more than one unless you uninstall and reinstall your app or clear the data of your app from settings. You can later access this token using: FirebaseInstanceId.getInstance().getToken();
Now let’s create our second service, name it MyFirebaseMessagingService.java. Here’s the code for the class:
public class MyFirebaseMessagingService extends FirebaseMessagingService {
@Override
public void onMessageReceived(RemoteMessage remoteMessage) {
// Not getting messages here? See why this may be: https://goo.gl/39bRNJ
Log.d("mylog", "From: " + remoteMessage.getFrom());
}
In the onMessageReceived method, we get a remoteMessage object that contains notification details like title, body and data payload. We will discuss it in detail in the next section. However our app is ready to receive notifications.
Receiving Notification and Data Payload in App
Till now, our app can just receive notifications without any other data. Now let’s do a little more and handle data other than just title and body as well. Keep in mind you can access this data only when you receive a notification when you app is in the foreground. We already have our MyFirebaseMessagingService class, just add the following lines of code in the onMessageReceivedMethod:
// Check if message contains a data payload.
        if (remoteMessage.getData().size() > 0) {
            Log.d("mylog", "Message data payload: " + remoteMessage.getData());
        }
        // Check if message contains a notification payload.
        if (remoteMessage.getNotification() != null) {
            Log.d("mylog", "Body: " + remoteMessage.getNotification().getBody());
            Log.d("mylog", "Title: " + remoteMessage.getNotification().getTitle());
        }
String message = remoteMessage.getData().get("message");
Log.d("mylog", "Message Payload: " + message);
Intent intent = new Intent(getApplicationContext(), MainActivity.class);
intent.addFlags(Intent.FLAG_ACTIVITY_NEW_TASK|Intent.FLAG_ACTIVITY_CLEAR_TASK);
intent.putExtra("message", message);
getApplicationContext().startActivity(intent);
Here, remoteMessage.getNotification().getBody() gets the body of the notification and remoteMessage.getNotification().getBody() gets the title of the notification. Other then that if there is more data, known as data payload we can access it using remoteMessage.getData().get(“key”). Data payload is sent in key-value pair and values can be accessed using their key. In the code above, after the value of the key “message” is fetched, we start a new Activity with the message as extra. We don’t have that Activity yet, so let’s create a new Activity. First let us create a simple XML layout for the Activity. Name the layout activity_main.xml. Here’s the layout code:
<?xml version="1.0" encoding="utf-8"?>
<LinearLayout xmlns:android="http://schemas.android.com/apk/res/android"
    xmlns:tools="http://schemas.android.com/tools"
    android:layout_width="match_parent"
    android:layout_height="match_parent"
    android:gravity="center"
    android:orientation="vertical"
    tools:context="com.thecodecity.firebaserealtime.MainActivity">
<TextView
android:layout_width="wrap_content"
android:layout_height="wrap_content"
android:text="Message from Firebase Notification:"/>
<TextView
android:id="@+id/tvMessage"
android:layout_width="wrap_content"
android:layout_height="wrap_content"
android:text="No Message"
android:layout_margin="16dp" />
</LinearLayout>
It’s a simple layout that contains two TextViews. We will use one of the TextView to display the message sent in the Notification. Now let’s create the Activity. Name it MainActivity.java
public class MainActivity extends AppCompatActivity {
TextView textView;
@Override
protected void onCreate(Bundle savedInstanceState) {
super.onCreate(savedInstanceState);
setContentView(R.layout.activity_main);
textView = (TextView)findViewById(R.id.tvMessage);
String id = FirebaseInstanceId.getInstance().getToken();
Log.d("mylog", "Token: " + id);
Intent intent = getIntent();
if(intent.hasExtra("message")){
textView.setText(intent.getStringExtra("message"));
}
}
}
In this Activity we check the token for the device using FirebaseInstanceId.getInstance().getToken(); and display in in log. Then we check if the intent has an extra called “message”. If yes, then we change the content of the textView to that message. When we first open the App, there will be default text shown in the textView but if we send a notification with data that contains the key “message”. The message will be shown in the textView. Now we are all done. We just need to add the Activity and the Services that we created in the Manifest file and we are good to go. Put the following lines inside <application> tag:
   <service android:name=".MyFirebaseMessagingService">
            <intent-filter>
                <action android:name="com.google.firebase.MESSAGING_EVENT" />
            </intent-filter>
        </service>
<service android:name=".MyFirebaseInstanceIDService">
<intent-filter>
<action android:name="com.google.firebase.INSTANCE_ID_EVENT" />
</intent-filter>
</service>
<activity android:name=".MainActivity">
<intent-filter>
<action android:name="android.intent.action.MAIN" />
<category android:name="android.intent.category.LAUNCHER" />
</intent-filter>
</activity>
Also add the following permission outside of the <application> tag: <uses-permission android:name="android.permission.INTERNET"/>
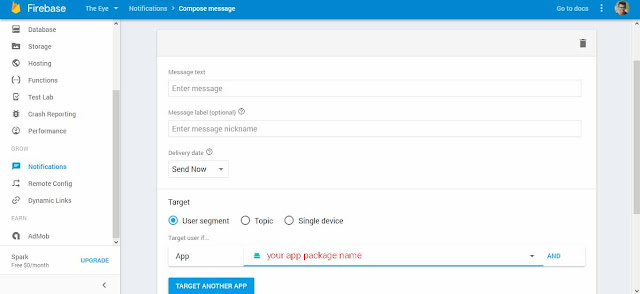
We are now done! we can now run our app and test notifications by sending notification from the Firebase notification console. Go to Firebase Console, select your project and scroll the left side bar to the bottom and click on notification. You’ll should now see a page similar to this:
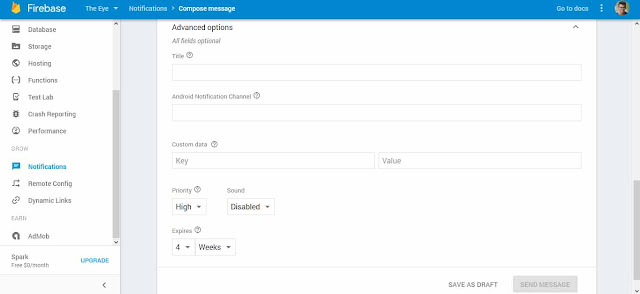
The options are self explanatory, the message text is the description part of the notification that is displayed below the notification title, Message label is for you so that you can later find this notification using this label. In the delivery date you can choose to send now or send later on a specified date or time and finally you can choose a package name to which you need to send notification. Now you can scroll down and click send notification and you’ll receive notification if your app is in the background. If you were attentive enough to see the advanced options button while scrolling down, clicking on that button will reveal some options looking like this:
The title option is self explanatory, it’s the title of the notification that the users will see, Notification channel is a new feature since Marshmallow that allows sending notifications to certain channel within app like sports, news etc. Custom data allows to send extra data that can be retrieved using key value pairs. Try it out, minimize our app and send notifications. Open the app and send notification with key value pairs and you should see the contents of the TextView change. That’s it, we have a fully functional app with cloud notification working. We will cover some more advanced stuff with Firebase Cloud Messaging in the next tutorial. If you have any issues, feel free to comment them below. I’ll try to solve it to the best of my abilities. Cheers! happy coding.
SOURCE CODE: Firebase Cloud Messaging Android App


Great job for publishing such a beneficial web site. Your web log isn’t only useful but it is additionally really creative too. Texting services