If you have an app that required user login, providing Facebook login in your Android App can be an easy and convenient way for both your user and you to implement login. Now a days we can see lot of web and mobile apps provide an option to Login with Facebook along with the general email and password login. Most people already have a Facebook account and it’s easy to just login using Facebook rather than to first register using email and password. This has become more of a common trend because of how easy Facebook has made integrating Facebook Login in your Android App or any app for that matter. So integrating Facebook Login in you App is a win-win situation for both you and your users.
Let’s begin with latest Facebook’s SDK for Android, it should take only a few minutes to add this feature to your app. After the basic login, we will also see how we can get the Facebook Profile Picture in our Android app and other profile details like email, date of birth, name and more.
This we will cover in this tutorial:
- Creating a new project and registering it in Facebook Developers for Facebook Login.
- Integrate Facebook Login in our Android App.
- Get User profile detail like User ID, Profile Picture, Email, First Name, Last Name and more.
Note: By Default, when you perform Facebook Login in you Android App, the you can access some details like : id, cover, name, gender, profile picture and few more. You don’t to do any more requests to get the mentioned details, however if you need to access other details like Email you need to define those properties while you login, so that Facebook can ask if you want to allow an app to access those properties. You’ll notice in our app that we explicitly define we need Email, so that Facebook can let you know the app will access your Email. You can check out more details in Facebook’s official Page: Facebook Login Permissions
Pre-requisites:
- A Facebook Account to test login.
- Installed Android Studio on your laptop or PC.
- An Android Device.
So let’s begin!
Adding Facebook Login to our Android App:
1. Create a new Android App.
First of all, let’s open up Android Studio and create a new App. Let’s call the app myloginapp. After the app is created we don’t need to write any code at the moment. Just keep in mind or copy the package name from Manifest file or App level Gradle file. We will need the package name of the name when we are registering the App for Facebook Login.
2. Add the App in Facebook developer page.
Now that we have our Android App’s package Name, we can go to Facebook Developers Page and Register our app and integrate Facebook Login. Go to: Facebook for Developers You’ll see a page similar to this:
  |
| Register Android App for Facebook Login |
Now click on the create new app button and enter the package name of your Android App. It will show a warning that the App cannot be found on the Play Store, click on add the app anyway as we are just building our Android app. Now we have successfully added our Android App for Facebook Login, we just need to add hash, we’ll do that is the following sections.
3. Add necessary Dependencies.
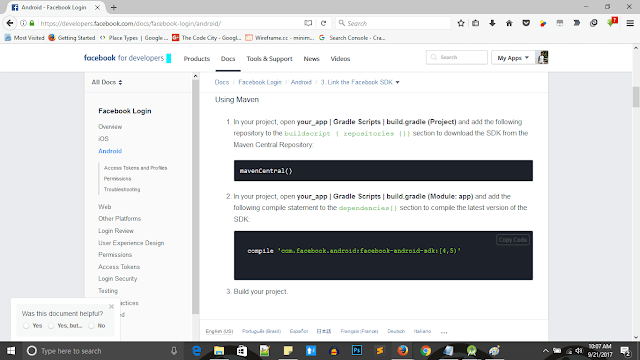
Now if you scroll down you’ll find adding dependencies section like this:
  |
| Facebook Dependencies for Android App |
We need to include these dependencies to use the Facebook SDK for Android. The Facebook SDK contains methods and callback that makes Facebook login integration very easy in an Android App. Add mavenCentral() in project level repositories section and and the dependency “compile ‘com.facebook.android:facebook-android-sdk:[4,5)'” in App Level Gradle File. You Project level Gradle file should look like this: And App level Gradle file should look like this.
4. Add App ID to strings.xml and edit Manifest file.
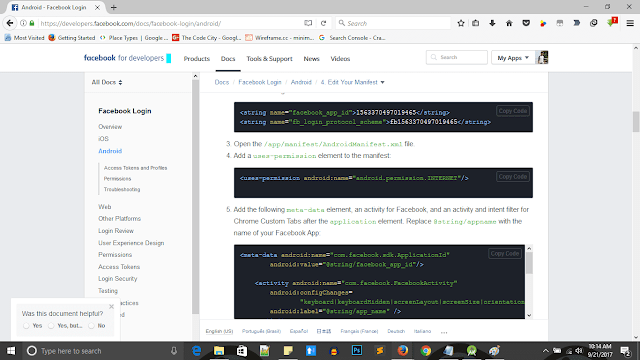
Now you’ll need to add your Facebook App Id and protocol scheme in strings.xml, inside values folder. If you scroll down on the developer’s page you can find you APP ID and Protocol Scheme. After adding the dependencies, you will need to add you APP ID in strings.xml inside values folder. App ID is unique for each app and it will identify your Android App uniquely.
  |
| Facebook App ID |
Copy them and paste it in your strings.xml. If you have strings.xml corresponding to multiple languages, paste it in all the strings.xml. Now open you manifest.xml file. We need to add the internet permissions for obvious reasons and also meta-data required for Facebook Login, do not forget this as the Login won’t work without this. So add internet permission: “<uses-permission android:name=”android.permission.INTERNET” />
<manifest xmlns:android="http://schemas.android.com/apk/res/android"
    package="com.thecodecity.myloginapp">
<uses-permission android:name="android.permission.INTERNET" />
<application
android:allowBackup="true"
android:icon="@mipmap/ic_launcher"
android:label="@string/app_name"
android:roundIcon="@mipmap/ic_launcher_round"
android:supportsRtl="true"
android:theme="@style/AppTheme">
<meta-data
android:name="com.facebook.sdk.ApplicationId"
android:value="@string/facebook_app_id" />
<activity
android:name="com.facebook.FacebookActivity"
android:configChanges="keyboard|keyboardHidden|screenLayout|screenSize|orientation"
android:label="@string/app_name" />
</application>
</manifest>
5. Generate and add Key Hash.
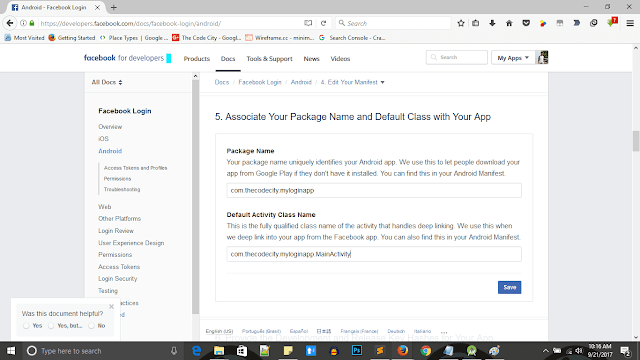
Now scroll down on the Facebook Developers page and you’ll see a section that looks like this:
  |
| Associating Package Name |
This is the Final Part of App registration. We can start coding after this. Enter your package name that you had entered earlier in step 2. In the default Activity class name, enter your package name followed by .MainActivity
We don’ have an activity created yet so now we’ll have to name our launcher Activity MainActivity. Finally, if you scroll down a bit more you’ll see a section that requires Key Hash, for development you’ll need to get your debug key hashes. Use the following commands to get key hashes.
On Windows: keytool -exportcert -alias androiddebugkey -keystore %HOMEPATH%.androiddebug.keystore | openssl sha1 -binary | openssl base64
On Mac: keytool -exportcert -alias androiddebugkey -keystore %HOMEPATH%.androiddebug.keystore | openssl sha1 -binary | openssl base64
In windows the HOMEPATH is usually C:/Users/Username.
If you are having problems like Command keytool not recognized, you’ll need to go to your Java installation directory and run the command from inside the bin folder. If you are having problems with the ssl command, you’ll probably need to install SSL, refer here if you have problem with SSL command: OpenSSL Issues.
6. Create Facebook Login Activity Layout.
Now finally we can do some code. We have successfully registered our Android App to Facebook, added the required dependencies and modified the Manifest file appropriately. Now let’s write some code. Switch to Android Studio and create a new layout file. Name it activity_main.xml. We will add the default Facebook Login button provided by Facebook Android SDK. The Default Facebook Button looks like this:
  |
| Default Facebook Login Button for Android app |
The Layout is pretty simple and should look like this: main_activity.xml<?xml version="1.0" encoding="utf-8"?>
<LinearLayout xmlns:android="http://schemas.android.com/apk/res/android"
android:layout_width="match_parent"
android:layout_height="match_parent"
android:gravity="center">
<com.facebook.login.widget.LoginButton
android:id="@+id/login_button"
android:layout_width="wrap_content"
android:layout_height="wrap_content"
android:text="Connect with FB"
android:layout_marginBottom="30dp"
android:layout_marginTop="30dp" />
</LinearLayout>
The default text on the button is Connect with Facebook. To change the text on the Button we need to add this in LoginButton:
facebook:com_facebook_login_text=”Your Login Text”
To change the Text for logout add the following code to the button facebook:com_facebook_logout_text=”You Logout Text”
7. Create Facebook Login Activity Java File.
Now Create a new java file and name it MainActivity.java. We will do following things in this class:
- Add Reference to the Facebook Login button.
- Initialize a callback Manager to get Login Request Result.
- Register the callback Manger with Facebook Login button.
- Call the Callback Manager in onActivityResult.
Here’s what you MainActivity.java should look like:
public class MainActivity extends AppCompatActivity {
LoginButton loginButton;
CallbackManager callbackManager;
@Override
protected void onCreate(Bundle savedInstanceState) {
super.onCreate(savedInstanceState);
setContentView(R.layout.activity_main);
loginButton = (LoginButton) findViewById(R.id.login_button);
loginButton.setReadPermissions("email");
callbackManager = CallbackManager.Factory.create();
// Callback registration
loginButton.registerCallback(callbackManager, new FacebookCallback<LoginResult>() {
@Override
public void onSuccess(LoginResult loginResult) {
// App code
Log.d("mylog", "Successful: " + loginResult.getAccessToken());
Log.d("mylog", "User ID: " + Profile.getCurrentProfile().getId());
Log.d("mylog", "User Profile Pic Link: " + Profile.getCurrentProfile().getProfilePictureUri(500, 500));
}
@Override
public void onCancel() {
// App code
}
@Override
public void onError(FacebookException exception) {
// App code
Log.d("mylog", "Successful: " + exception.toString());
}
});
}
@Override
protected void onActivityResult(int requestCode, int resultCode, Intent data) {
super.onActivityResult(requestCode, resultCode, data);
callbackManager.onActivityResult(requestCode, resultCode, data);
}
}
Now if the Facebook Login is successfully added, you should be able to see Access token, User ID and Link to Facebook’s Profile Picture in the log.The code is pretty simple, we are just getting reference to Facebook login button then setting email read permission and the registering the callback manager. Don’t forget to include the onActivityResult, as that part triggers the callback manager. If you just want a secure login, then we are done, we’ve successfully integrated Facebook Login to our Android App.
8. Perform Graph Request to get User Details like Email and Birthday.
We now have successfully logged in, but what if we need more user details. It’s always good to greet the user with a Happy Birthday message in your app. So in order to get more details, we utilize the graph request feature of the Facebook SDK. It’s pretty simple you just define what you need to read from the Facebook Profile of the User and execute the request. Add this performGraphRequest method to you MainActivity.java and call it from the onSuccess method of the FacebookCallback that you had registered with Facebook Button in the previous step: Here’s the performGraphRequestMethod:
 private void performGraphRequest(LoginResult loginResult) {
        GraphRequest request = GraphRequest.newMeRequest(loginResult.getAccessToken(), new GraphRequest.GraphJSONObjectCallback() {
            @Override
            public void onCompleted(JSONObject json, GraphResponse response) {
                // Application code
                if (response.getError() != null) {
                    System.out.println("ERROR");
                } else {
                    System.out.println("Success");
                    String jsonresult = String.valueOf(json);
                    Log.d("mylog", "JSON Result" + jsonresult);
String fbUserFirstName = json.optString("name");
String fbUserEmail = json.optString("email");
String fbBirthday = json.optString("birthday");
}
Log.v("FaceBook Response :", response.toString());
}
});
Bundle parameters = new Bundle();
parameters.putString("fields", "id,name,email,gender, birthday");
request.setParameters(parameters);
request.executeAsync();
}
So we are requesting more of the user details when the user is successfully logged in to your app using Facebook. Here’s the performGraphRequest method: We are done, now just run the App in your Android Phone and test it. You should be able to see the user details in the Logs. Use it creatively. This marks the end of this tutorial, if you have any problems just let me know in the comments below, excited to see what you build! Happy Coding.
Download the full source code: Facebook Login Integration in Android App.


Currently it looks like BlogEngine is the best blogging platform available right now. (from what I’ve read) Is that what you’re using on your blog? سایبربان