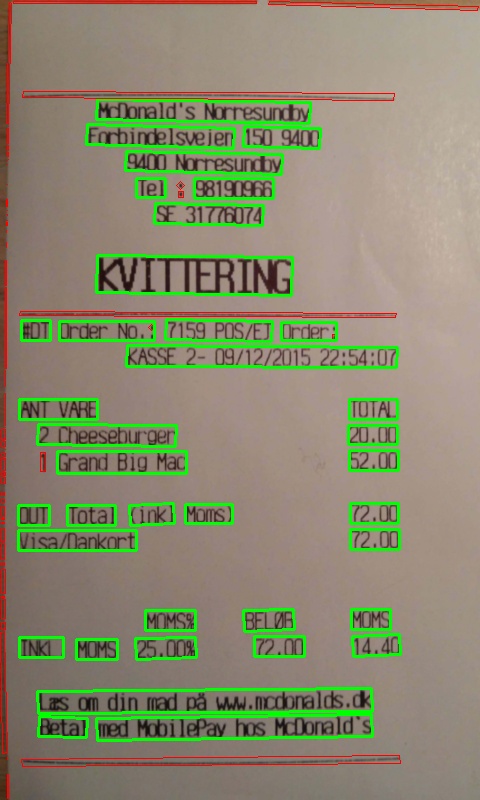
For Real Time text detection in Android, we will be using OpenCV, and to recognize the text in from the detected text region, we will use Tesseract text detection engine for Android. This part deals with the text detection using OpenCV for Android part. In the next part we will recognize the detected text using openCV.
Android Text Detection using MSER Algorithm
To detect the text region, we will use MSER algorithm using OpenCV for Android. MSER stands for maximally stable extremal regions and is a very popular method used for blob detection from images. We will be using MSER as it detects many key characteristics of the region under study and can be used to study very small regions too.
Steps to detect text region in android using OpenCV (MSER algorithm) are :
1. Create a layout containing JavaCameraView
2. Create an Activity that implements CameraBridgeViewBase.CvCameraViewListener
3. Perform the Text Detection inside the OnCameraFrame
  |
| Text Detection from an Image of a Bill |
First let us create a Layout that will contain the JavaCameraView, Here is the code for main_layout containing javaCameraView –
<LinearLayout xmlns:android="http://schemas.android.com/apk/res/android"
    android:layout_width="match_parent"
    android:layout_height="match_parent">
<org.opencv.android.JavaCameraView
android:id="@+id/my_java_camera"
android:layout_width="match_parent1"
android:layout_height="match_parent" />
</LinearLayout>
Now our layout is done, but there will be orientation problem, learn here – how to fix it and show full screen camera. Now we need an activity, here is the MainActivity for text detection in Android using openCV –
public class MainActivity extends AppCompatActivity implements CameraBridgeViewBase.CvCameraViewListener2{
  private Mat mGrey, mRgba;
  private JavaCameraView mOpenCvCameraView;
private BaseLoaderCallback mLoaderCallback = new BaseLoaderCallback(this) {
        @Override
        public void onManagerConnected(int status) {
            switch (status) {
                case LoaderCallbackInterface.SUCCESS: {
                    mOpenCvCameraView.enableView();
                }
                break;
                default: {
                    super.onManagerConnected(status);
                }
                break;
            }
        }
    };
@Override
    public void onCreate(Bundle savedInstanceState) {
        super.onCreate(savedInstanceState);
//FULLSCREEN MODE
getWindow().setFlags(WindowManager.LayoutParams.FLAG_FULLSCREEN, WindowManager.LayoutParams.FLAG_FULLSCREEN);
getWindow().addFlags(WindowManager.LayoutParams.FLAG_KEEP_SCREEN_ON);
setContentView(R.layout.main_layout);
mOpenCvCameraView = (MTCameraView) findViewById(R.id.my_java_camera);
mOpenCvCameraView.setVisibility(SurfaceView.VISIBLE);
mOpenCvCameraView.setCvCameraViewListener(this);
}
public Mat onCameraFrame(CameraBridgeViewBase.CvCameraViewFrame inputFrame) {
mGrey = inputFrame.gray();
mRgba = inputFrame.rgba();
detectText();
return mRgba;
}
@Override
public void onPause() {
super.onPause();
if (mOpenCvCameraView != null)
mOpenCvCameraView.disableView();
}
@Override
public void onResume() {
super.onResume();
if (!OpenCVLoader.initDebug()) {
OpenCVLoader.initAsync(OpenCVLoader.OPENCV_VERSION_3_1_0, this, mLoaderCallback);
} else {
mLoaderCallback.onManagerConnected(LoaderCallbackInterface.SUCCESS);
}
}
public void onDestroy() {
super.onDestroy();
if (mOpenCvCameraView != null)
mOpenCvCameraView.disableView();
}
public void onCameraViewStarted(int width, int height) {
mIntermediateMat = new Mat();
mGrey = new Mat(height, width, CvType.CV_8UC4);
mRgba = new Mat(height, width, CvType.CV_8UC4);
}
private void detectText() {
MatOfKeyPoint keypoint = new MatOfKeyPoint();
List<KeyPoint> listpoint;
KeyPoint kpoint;
Mat mask = Mat.zeros(mGrey.size(), CvType.CV_8UC1);
int rectanx1;
int rectany1;
int rectanx2;
int rectany2;
int imgsize = mGrey.height() * mGrey.width();
Scalar zeos = new Scalar(0, 0, 0);
List<MatOfPoint> contour2 = new ArrayList<MatOfPoint>();
Mat kernel = new Mat(1, 50, CvType.CV_8UC1, Scalar.all(255));
Mat morbyte = new Mat();
Mat hierarchy = new Mat();
Rect rectan3;
//
FeatureDetector detector = FeatureDetector
.create(FeatureDetector.MSER);
detector.detect(mGrey, keypoint);
listpoint = keypoint.toList();
//
for (int ind = 0; ind < listpoint.size(); ind++) {
kpoint = listpoint.get(ind);
rectanx1 = (int) (kpoint.pt.x - 0.5 * kpoint.size);
rectany1 = (int) (kpoint.pt.y - 0.5 * kpoint.size);
rectanx2 = (int) (kpoint.size);
rectany2 = (int) (kpoint.size);
if (rectanx1 <= 0)
rectanx1 = 1;
if (rectany1 <= 0)
rectany1 = 1;
if ((rectanx1 + rectanx2) > mGrey.width())
rectanx2 = mGrey.width() - rectanx1;
if ((rectany1 + rectany2) > mGrey.height())
rectany2 = mGrey.height() - rectany1;
Rect rectant = new Rect(rectanx1, rectany1, rectanx2, rectany2);
try {
Mat roi = new Mat(mask, rectant);
roi.setTo(CONTOUR_COLOR);
} catch (Exception ex) {
Log.d("mylog", "mat roi error " + ex.getMessage());
}
}
Imgproc.morphologyEx(mask, morbyte, Imgproc.MORPH_DILATE, kernel);
Imgproc.findContours(morbyte, contour2, hierarchy,
Imgproc.RETR_EXTERNAL, Imgproc.CHAIN_APPROX_NONE);
for (int ind = 0; ind < contour2.size(); ind++) {
rectan3 = Imgproc.boundingRect(contour2.get(ind));
rectan3 = Imgproc.boundingRect(contour2.get(ind));
if (rectan3.area() > 0.5 * imgsize || rectan3.area() < 100
|| rectan3.width / rectan3.height < 2) {
Mat roi = new Mat(morbyte, rectan3);
roi.setTo(zeos);
} else
Imgproc.rectangle(mRgba, rectan3.br(), rectan3.tl(),
CONTOUR_COLOR);
}
}
}
And we our done! Bravo. Now just declare the activity in the manifest and run it, you will be able to see our app detecting various regions. It’s our job to decide which one is the appropriate text region. In the code above to, the text detection method is detectText(); it contains initialization of feature detector for MSER. So now you can see that our app is capable of detecting region. In the next part, we will seee how we can extract those regions and pass it to Tesseract for text Recognition. Stay tuned to this guide on text detection in Android Using OpenCV, the second part will is out! Check out – Text detection using Tesseract.
Happy coding, do ask any questions that you have below or reach me out on social media platforms.
